 |
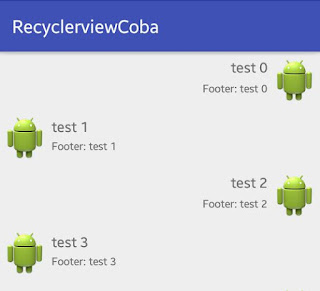
| Gambar 1. Recyclerview Dengan Baris Layout Berbeda |
Jika sebelumnya telah dipaparkan bagaimana membuat Simpel Recyclerview yang standar (Membuat Simpel Recyclerview Lengkap Sampai Jadi -Android) , padakali ini akan memaparkan bagaimana membuat simpel recyclerview dengan baris layout berbeda. Sebagai contoh akan menggunakan 2 baris layout.
Sebelum membuat recyclerview tipe ini disarankan pernah membuat yang standar terlebih dahulu (Membuat Simpel Recyclerview Lengkap Sampai Jadi -Android)
layout baris yang pertama:
rowlayoutleft.xml:
<RelativeLayout xmlns:android="http://schemas.android.com/apk/res/android"
    android:layout_width="fill_parent"
    android:layout_height="?android:attr/listPreferredItemHeight"
    android:padding="6dip" >

    <ImageView
        android:id="@+id/icon"
        android:layout_width="wrap_content"
        android:layout_height="fill_parent"
        android:layout_alignParentBottom="true"
        android:layout_alignParentTop="true"
        android:layout_marginRight="6dip"
        android:contentDescription="TODO"
        android:src="@android:mipmap/sym_def_app_icon" />

    <TextView
        android:id="@+id/secondLine"
        android:layout_width="fill_parent"
        android:layout_height="26dip"
        android:layout_alignParentBottom="true"
        android:layout_alignParentRight="true"
        android:layout_toRightOf="@id/icon"
        android:ellipsize="marquee"
        android:singleLine="true"
        android:text="Description"
        android:textSize="12sp" />

    <TextView
        android:id="@+id/firstLine"
        android:layout_width="fill_parent"
        android:layout_height="wrap_content"
        android:layout_above="@id/secondLine"
        android:layout_alignParentRight="true"
        android:layout_alignParentTop="true"
        android:layout_alignWithParentIfMissing="true"
        android:layout_toRightOf="@id/icon"
        android:gravity="center_vertical"
        android:text="Example application"
        android:textSize="16sp" />

</RelativeLayout>
layout baris yang kedua:
rowlayoutright.xml:
<RelativeLayout xmlns:android="http://schemas.android.com/apk/res/android"
    android:layout_width="fill_parent"
    android:layout_height="?android:attr/listPreferredItemHeight"
    android:padding="6dip" >

    <ImageView
        android:id="@+id/icon"
        android:layout_width="wrap_content"
        android:layout_height="fill_parent"
        android:layout_alignParentBottom="true"
        android:layout_alignParentTop="true"
        android:layout_alignParentRight="true"
        android:layout_marginLeft="6dip"
        android:contentDescription="TODO"
        android:src="@android:mipmap/sym_def_app_icon" />

    <TextView
        android:id="@+id/secondLine"
        android:layout_width="fill_parent"
        android:layout_height="26dip"
        android:layout_alignParentBottom="true"
android:gravity="right"
        android:ellipsize="marquee"
        android:singleLine="true"
        android:text="Description"
        android:textSize="12sp"
        android:layout_toLeftOf="@+id/icon"
        android:layout_toStartOf="@+id/icon" />

    <TextView

        android:id="@+id/firstLine"

        android:layout_width="fill_parent"
        android:layout_height="wrap_content"
        android:layout_above="@id/secondLine"
        android:layout_alignParentTop="true"
        android:layout_alignWithParentIfMissing="true"
        android:gravity="right"
        android:text="Example application"
        android:textSize="16sp"
        android:layout_toLeftOf="@+id/icon"
        android:layout_toStartOf="@+id/icon" />

</RelativeLayout>
activity_main.xml:
<RelativeLayout xmlns:android="http://schemas.android.com/apk/res/android"
    xmlns:tools="http://schemas.android.com/tools"
    android:layout_width="match_parent"
    android:layout_height="match_parent"
    >

    <!-- A RecyclerView with some commonly used attributes -->

    <android.support.v7.widget.RecyclerView
        android:id="@+id/my_recycler_view"
        android:layout_width="match_parent"
        android:layout_height="match_parent"
        android:scrollbars="vertical" />


</RelativeLayout>
MainActivity.java:
package oddsaydev.recyclerviewcoba;
import android.os.Bundle;
import android.support.v7.app.AppCompatActivity;
import android.support.v7.widget.LinearLayoutManager;
import android.support.v7.widget.RecyclerView;


import java.util.ArrayList;

public class MainActivity extends AppCompatActivity {
    private RecyclerView mRecyclerView;
    private RecyclerView.Adapter mAdapter;
    private RecyclerView.LayoutManager mLayoutManager;

    @Override
    protected void onCreate(Bundle savedInstanceState) {
        super.onCreate(savedInstanceState);
        setContentView(R.layout.activity_main);
        mRecyclerView = (RecyclerView) findViewById(R.id.my_recycler_view);

        // use this setting to improve performance if you know that changes
        // in content do not change the layout size of the RecyclerView
        mRecyclerView.setHasFixedSize(true);

        // use a linear layout manager
        mLayoutManager = new LinearLayoutManager(this);
        mRecyclerView.setLayoutManager(mLayoutManager);

        // specify an adapter (see also next example)
        ArrayList<String> mDataset=new ArrayList<>();
        for(int i=0;i<10;i++){
        String a="test "+i;
        mDataset.add(a);}
        mAdapter = new MyAdapter(mDataset);

        mRecyclerView.setAdapter(mAdapter);
    }

}
MyAdapter.java:
package oddsaydev.recyclerviewcoba;

/**
 * Created by Windows on 13/02/2017.
 */
import java.util.ArrayList;

import android.content.Context;
import android.support.v7.widget.RecyclerView;
import android.view.Gravity;
import android.view.LayoutInflater;
import android.view.View;
import android.view.View.OnClickListener;
import android.view.ViewGroup;
import android.widget.TextView;
import android.widget.Toast;

public class MyAdapter extends RecyclerView.Adapter<MyAdapter.ViewHolder> {
    private ArrayList<String> mDataset;

    // Provide a reference to the views for each data item
    // Complex data items may need more than one view per item, and
    // you provide access to all the views for a data item in a view holder
    public class ViewHolder extends RecyclerView.ViewHolder {
        // each data item is just a string in this case
        public TextView txtHeader;
        public TextView txtFooter;

        public ViewHolder(View v) {
            super(v);
            txtHeader = (TextView) v.findViewById(R.id.firstLine);
            txtFooter = (TextView) v.findViewById(R.id.secondLine);

        }
    }

    public void add(int position, String item) {
        mDataset.add(position, item);
        notifyItemInserted(position);
    }

    public void remove(String item) {
        int position = mDataset.indexOf(item);
        mDataset.remove(position);
        notifyItemRemoved(position);
    }

    // Provide a suitable constructor (depends on the kind of dataset)
    public MyAdapter(ArrayList<String> myDataset) {
        mDataset = myDataset;
    }

    // Create new views (invoked by the layout manager)
    Context context;
    @Override
    public MyAdapter.ViewHolder onCreateViewHolder(ViewGroup parent,
                                                   int viewType) {
        // create a new vie
        View v;
        ViewHolder vh;
        switch (viewType) {
            case TYPE_HEADER:
                 v = LayoutInflater.from(parent.getContext()).inflate(R.layout.rowlayoutright, parent, false);
                 vh = new ViewHolder(v);
                return vh;
            case TYPE_CELL:
               v = LayoutInflater.from(parent.getContext()).inflate(R.layout.rowlayoutleft, parent, false);
                 vh = new ViewHolder(v);
                return vh;        }


        return null;
    }
    private static final int TYPE_HEADER = 0;
    private static final int TYPE_CELL = 1;


    @Override
    public int getItemViewType(int position) {
        if (position%2 == 0)
            return TYPE_HEADER;
        else
            return TYPE_CELL;
    }
    // Replace the contents of a view (invoked by the layout manager)
    @Override
    public void onBindViewHolder(final ViewHolder holder, final int position) {
        // - get element from your dataset at this position
        // - replace the contents of the view with that element
        final String name = mDataset.get(position);

        switch (getItemViewType(position)) {
            case TYPE_HEADER:
                holder.txtHeader.setText(mDataset.get(position));
                holder.txtHeader.setOnClickListener(new OnClickListener() {
                    @Override
                    public void onClick(View v) {
                        //  remove(name);
                        Toast toast= Toast.makeText(v.getContext(),
                                "Gambar Kanan "+position, Toast.LENGTH_SHORT);
                        toast.show();            }
                });

                holder.txtFooter.setText("Footer: " + mDataset.get(position));
                break;
            case TYPE_CELL:
                holder.txtHeader.setText(mDataset.get(position));
                holder.txtHeader.setOnClickListener(new OnClickListener() {
                    @Override
                    public void onClick(View v) {
                        //  remove(name);
                        Toast toast= Toast.makeText(v.getContext(),
                                "Gambar Kiri "+position, Toast.LENGTH_SHORT);
                        toast.show();            }
                });

                holder.txtFooter.setText("Footer: " + mDataset.get(position));                break;
        }


    }

    // Return the size of your dataset (invoked by the layout manager)
    @Override
    public int getItemCount() {
        return mDataset.size();
    }

}
-)Potongan kode dibawah pada MyAdapter.java menentukan kapan layout baris pertama dan kedua digunakan
    @Override
    public MyAdapter.ViewHolder onCreateViewHolder(ViewGroup parent,
                                                   int viewType) {
        // create a new vie
        View v;
        ViewHolder vh;
        switch (viewType) {
            case TYPE_HEADER:
                 v = LayoutInflater.from(parent.getContext()).inflate(R.layout.rowlayoutright, parent, false);
                 vh = new ViewHolder(v);
                return vh;
            case TYPE_CELL:
               v = LayoutInflater.from(parent.getContext()).inflate(R.layout.rowlayoutleft, parent, false);
                 vh = new ViewHolder(v);
                return vh;        }


        return null;
    }
    private static final int TYPE_HEADER = 0;
    private static final int TYPE_CELL = 1;


    @Override
    public int getItemViewType(int position) {
        if (position%2 == 0)
            return TYPE_HEADER;
        else
            return TYPE_CELL;
    }
Hasil dari running kode2 diatas
 |
| Gambar 2. Hasil akhir |
Selamat bereksperimen sekian dan terimakasih

0 komentar:
Post a Comment