Showing posts with label Android. Show all posts

Thursday 30 March 2017

Menggunakan Database Firebase 1 -Android

Gambar 1. Logo Firebase


Salah layanan yang diberikan firebase yaitu real time database. Database ini dapat digunakan untuk membuat aplikasi chat atau aplikasi yang membutuhkan kecepatan dan keringanan dalam transaksi data. Ditinjau dari biaya yang dikeluarkan, penggunaan firebase lebih menguntungkan dibanding sewa hosting karena layanan firebase diberikan secara gratis namun pada batasan  penggunaan yang telah ditentukan.

Lihat besar biaya untuk layanan firebase:

Gambar 2. Tabel  biaya untuk layanan firebase

sumber: https://firebase.google.com/pricing/


1. Untuk cara mendaftar firebase lihat:
https://komputasistat.blogspot.co.id/2016/09/mendaftar-akun-project-di-firebase_25.html


2. Setelah selesai mendaftar 
kemudian pilih project android:

Gambar 3. memilih project Android

3. Daftar nama package aplikasi android dan SHA-1.
Nama package harus sesuai dengan nama package aplikasi. Cara mendapatkan SHA-1 dapat lihat di:
https://komputasistat.blogspot.co.id/2015/10/medapatkan-android-api-key.html

Gambar 4. Daftarkan nama package aplikasi android dan SHA-1

4. Dapatkan/unduh google service json seperti gambar 5

Gambar 5.  Mengunduh  google-services.json 

5. Copy google-services.json/hasil unduhan di direktori app seperti gambar 6.

Gambar 6.  Meng-copy google-services.json 


6. copy


classpath 'com.google.gms:google-services:3.0.0'

di build.gradle (Project:...)

Gambar 7. copy classpath gms


7. copy


    compile 'com.google.firebase:firebase-database:9.6.1'
}
apply plugin: 'com.google.gms.google-services'

di build,gradle(app

Gambar 8. copy library


lanjutanya:


Sekian dan terima kasih


Monday 6 March 2017

Cara Membuat SMS Gateway Sederhana -Android

Spesifikasi source code SMS Gateway Sederhana :
- Bisa menjawab dan menerima SMS secara otomatis ketika sms diterima
- Menggunakan fungsi if sederhana dalam menjawab pesan
- Tanpa database

Gambar 1. Hasil running source code 


Source code:

1. Manifest:

<?xml version="1.0" encoding="utf-8"?>
<manifest xmlns:android="http://schemas.android.com/apk/res/android"
    package="oddsaydev.smsgatewaysederhana">
    <uses-permission android:name="android.permission.RECEIVE_SMS" />
    <uses-permission android:name="android.permission.SEND_SMS" />
    <uses-permission android:name="android.permission.READ_SMS" />
    <application
        android:allowBackup="true"
        android:icon="@mipmap/ic_launcher"
        android:label="@string/app_name"
        android:supportsRtl="true"
        android:theme="@style/AppTheme">
        <activity android:name=".MainActivity">
            <intent-filter>
                <action android:name="android.intent.action.MAIN" />

                <category android:name="android.intent.category.LAUNCHER" />
            </intent-filter>
        </activity>
        <receiver android:name=".ReceiveSms" >
            <intent-filter>
                <action android:name="android.provider.Telephony.SMS_RECEIVED" />
            </intent-filter>
        </receiver>
    </application>

</manifest>

2. ReceiveSms.java


/**
 * Created by Windows on 06/03/2017.
 */
import android.content.BroadcastReceiver;
import android.content.Context;
import android.content.Intent;
import android.media.AudioManager;
import android.media.ToneGenerator;
import android.os.Bundle;
import android.telephony.SmsManager;
import android.telephony.SmsMessage;

public class ReceiveSms extends BroadcastReceiver{
    @Override
    public void onReceive(Context context, Intent intent) {
        Bundle myBundle = intent.getExtras();
        SmsMessage [] messages = null;
        String strMessage = "";
        String nohp="";
        String pesan="";
        if (myBundle != null)
        {
            Object [] pdus = (Object[]) myBundle.get("pdus");
            messages = new SmsMessage[pdus.length];

            for (int i = 0; i < messages.length; i++)
            {
                messages[i] = SmsMessage.createFromPdu((byte[]) pdus[i]);

                nohp =messages[i].getOriginatingAddress();
                        pesan=messages[i].getMessageBody();
            }

           // Toast.makeText(context, strMessage, Toast.LENGTH_SHORT).show();
            String balasan="";
if(pesan.equals("reg")){

    balasan="Selamat datang, pilih 1 untuk bahasa Inggris, pilih 2 untuk bahasa Indonesia";
}else if(pesan.equals("1")){
    balasan="Anda memilih 1 untuk bahasa Inggris";
}else if(pesan.equals("2")){
    balasan="Anda memilih 1 untuk bahasa Indonesia";
}

     SmsManager smsManager = SmsManager.getDefault();
         smsManager.sendTextMessage(nohp, null, balasan, null, null);
        }
        ToneGenerator toneG = new ToneGenerator(AudioManager.STREAM_ALARM, 100);
        toneG.startTone(ToneGenerator.TONE_CDMA_ALERT_CALL_GUARD, 200);
    }


    }

Selamat bereksperimen
sekian dan terimakasih..


Cara Menampilkan Dengan Sederhana Koordinat Dari GPS Provider -Android

Gambar 1. Latitude dan Longitude


Salah satu fitur android yang laris  digunakan saat ini yaitu fitur GPS. Fitur GPS pada android dapat digunakan untuk menentukan lokasi kita dan man-share pada orang lain sehingga keberadaan kita diketahui contohnya pada aplikasi gojek, uber dan lainya.

Ada tiga cara pada android untuk menentukan lokasi kita yaitu menggunakan fungsi chip gps, tower selular dan menggunakan lokasi akses poin wifi. Masing-masing cara tersebut punya kelebihan dan kekurangan sehingga dalam menggunakan nya perlu strategi. Strategi tersebut disesuaikan dengan kebutuhan kita terhadap gps. Pada situs Google developer resmi telah merilis strategi itu yang bagus untuk dipahami berikut urlnya: https://developer.android.com/guide/topics/location/strategies.html.

Pada kali ini saya akan memberikan source code bagaimana menampilkan koordinat menggunakan fungsi chip gps/GPS Provider yang tertanam pada handphone. Saya menggunakan GPS Provider karena saya menginginkan keakuratan titik yang diperoleh. Sementara kelemahan menggunakan GPS Provider diantaranya boros batrai, hanya dapat berfungsi diarea terbuka/mudah terganggu oleh bangunan dan untuk mendapatkan suatu titik tertentu memerlukan waktu yang lebih lama dari network provider. Sumber kelemahan dan kelebihan GPS provider:  https://developerlife.com/2010/10/20/gps/


GPSTracker.java

import android.app.AlertDialog;
import android.app.Service;
import android.content.Context;
import android.content.DialogInterface;
import android.content.Intent;
import android.location.Location;
import android.location.LocationListener;
import android.location.LocationManager;
import android.os.Bundle;
import android.os.IBinder;
import android.provider.Settings;

public class GPSTracker extends Service implements LocationListener{

    private Context context;
    boolean isGPSEnabled = false;
    boolean isNetworkEnabled = false;
    boolean canGetLocation = false;

    Location location;
    double latitude,longitude;

    LocationManager locationManager;
    AlertDialogManager am = new AlertDialogManager();
    public GPSTracker(Context context){
        this.context = context;
        getLocation();
    }
    private Location getLocation() {
        // TODO Auto-generated method stub
        try{
            locationManager = (LocationManager)context.getSystemService(Context.LOCATION_SERVICE);

            isGPSEnabled = locationManager.isProviderEnabled(LocationManager.GPS_PROVIDER);

            isNetworkEnabled = locationManager.isProviderEnabled(LocationManager.NETWORK_PROVIDER);


                if (isGPSEnabled){
                    if (location == null){
                        locationManager.requestLocationUpdates(LocationManager.GPS_PROVIDER, 60000, 3, this);
                        if (locationManager != null){
                            location = locationManager.getLastKnownLocation(LocationManager.GPS_PROVIDER);
                            if (location != null){
                                latitude = location.getLatitude();
                                longitude = location.getLongitude();
                            }
                        }
                    }
                } else {
                    showAlertDialog();
                }
            
        }catch(Exception e){
            e.printStackTrace();
        }
        return location;
    }
    public void showSettingsAlert(){
        AlertDialog.Builder alertDialog = new AlertDialog.Builder(GPSTracker.this);

        // Setting Dialog Title
        alertDialog.setTitle("GPS is settings");

        // Setting Dialog Message
        alertDialog.setMessage("GPS is not enabled. Do you want to go to settings menu?");

        // Setting Icon to Dialog
        //alertDialog.setIcon(R.drawable.delete);

        // On pressing Settings button
        alertDialog.setPositiveButton("Settings", new DialogInterface.OnClickListener() {
            public void onClick(DialogInterface dialog,int which) {
                Intent intent = new Intent(Settings.ACTION_LOCATION_SOURCE_SETTINGS);
                startActivity(intent);
                dialog.cancel();
            }
        });

        // on pressing cancel button
        alertDialog.setNegativeButton("Cancel", new DialogInterface.OnClickListener() {
            public void onClick(DialogInterface dialog, int which) {
                dialog.cancel();
            }
        });

        // Showing Alert Message
        alertDialog.show();
    }

    public void showAlertDialog(){
        am.showAlertDialog(GPSTracker.this, "GPS Setting", "Gps is not enabled. Do you want to enabled it ?", false);
    }
    public double getLatitude(){
        if (location != null){
            latitude = location.getLatitude();
        }

        return latitude;
    }

    public double getLongitude(){
        if (location != null){
            longitude = location.getLongitude();
        }

        return longitude;
    }

    public boolean canGetLocation(){
        return this.canGetLocation;
    }
    @Override
    public void onLocationChanged(Location location) {
        // TODO Auto-generated method stub
        if (location != null){
            this.location = location;
        }
    }

    @Override
    public void onProviderDisabled(String provider) {
        // TODO Auto-generated method stub

    }

    @Override
    public void onProviderEnabled(String provider) {
        // TODO Auto-generated method stub

    }

    @Override
    public void onStatusChanged(String provider, int status, Bundle extras) {
        // TODO Auto-generated method stub

    }

    @Override
    public IBinder onBind(Intent intent) {
        // TODO Auto-generated method stub
        return null;
    }

}

AlertDialogManager.java

import android.app.AlertDialog;
import android.content.Context;
import android.content.DialogInterface;


public class AlertDialogManager {
    /**
     * Function to display simple Alert Dialog
     * @param context - application context
     * @param title - alert dialog title
     * @param message - alert message
     * @param status - success/failure (used to set icon)
     *      - pass null if you don't want icon
     * */
    public void showAlertDialog(Context context, String title, String message,
                                Boolean status) {
        AlertDialog alertDialog = new AlertDialog.Builder(context).create();

        // Setting Dialog Title
        alertDialog.setTitle(title);

        // Setting Dialog Message
        alertDialog.setMessage(message);

        if(status != null)
            // Setting alert dialog icon

        // Setting OK Button
        alertDialog.setButton("OK", new DialogInterface.OnClickListener() {
            public void onClick(DialogInterface dialog, int which) {
            }
        });

        // Showing Alert Message
        alertDialog.show();
    }

MainActivity.java

import android.support.v7.app.AppCompatActivity;
import android.os.Bundle;
import android.view.View;
import android.widget.Button;
import android.widget.EditText;
import android.widget.TextView;

import java.util.ArrayList;

import oddsaydev.getkoordinat.Helper.Datadata;
import oddsaydev.getkoordinat.Helper.MySQLiteHelper;

public class MainActivity extends AppCompatActivity {
    TextView       textView;        TextView     textView3;EditText editText;
    @Override
    protected void onCreate(Bundle savedInstanceState) {
        super.onCreate(savedInstanceState);
        setContentView(R.layout.activity_main);
        textView=(TextView)      findViewById(R.id.textView);
      

        Button       button=(Button)      findViewById(R.id.button);
        button.setOnClickListener(new View.OnClickListener() {
            @Override
            public void onClick(View view) {
                GPSTracker gps = new GPSTracker (MainActivity.this);
                double latitude = gps.getLatitude();
                double longitude= gps.getLongitude();
                textView.setText("Latitude: "+latitude+" Longitude: "+longitude);

            }
        });
       
    }

}

activity_main.xml

<?xml version="1.0" encoding="utf-8"?>
<RelativeLayout xmlns:android="http://schemas.android.com/apk/res/android"
    xmlns:tools="http://schemas.android.com/tools"
    android:layout_width="match_parent"
    android:layout_height="match_parent"
    android:paddingBottom="@dimen/activity_vertical_margin"
    android:paddingLeft="@dimen/activity_horizontal_margin"
    android:paddingRight="@dimen/activity_horizontal_margin"
    android:paddingTop="@dimen/activity_vertical_margin"
    tools:context="oddsaydev.getkoordinat.MainActivity">

    <TextView
        android:layout_width="wrap_content"
        android:layout_height="wrap_content"
        android:text="Hello World!"
        android:id="@+id/textView"
        android:layout_alignParentLeft="true"
        android:layout_alignParentStart="true" />

    <Button
        android:layout_width="wrap_content"
        android:layout_height="wrap_content"
        android:text="Ambil Koordinat"
        android:id="@+id/button"
        android:layout_below="@+id/textView"
        android:layout_alignParentLeft="true"
        android:layout_alignParentStart="true" />

</RelativeLayout>

Jangan lupa menambahkan permission Access Fine Location pada manifest untuk mengakses fitur GPS Provider


    <uses-permission android:name="android.permission.ACCESS_FINE_LOCATION" />


Hasil source code ini seperti gambar :

Gambar 2. Hasil source code


Aktifkan GPS mu dan dapatkan titik dimana kamu berada

Selamat bereksperimen..

Sekian dan Terima kasih


Sunday 5 March 2017

Membuat Simpel Recyclerview Dengan Baris Layout Berbeda -Android

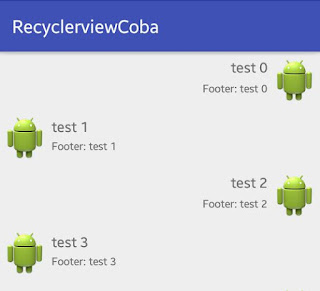
Gambar 1. Recyclerview Dengan Baris Layout Berbeda 


Jika sebelumnya telah dipaparkan bagaimana membuat  Simpel Recyclerview  yang standar (Membuat Simpel Recyclerview Lengkap Sampai Jadi -Android) , padakali ini akan memaparkan bagaimana membuat simpel recyclerview dengan baris layout berbeda. Sebagai contoh akan menggunakan 2 baris layout.

Sebelum membuat recyclerview tipe ini disarankan pernah membuat yang standar terlebih dahulu (Membuat Simpel Recyclerview Lengkap Sampai Jadi -Android)

layout baris yang pertama:
rowlayoutleft.xml:

<RelativeLayout xmlns:android="http://schemas.android.com/apk/res/android"
    android:layout_width="fill_parent"
    android:layout_height="?android:attr/listPreferredItemHeight"
    android:padding="6dip" >

    <ImageView
        android:id="@+id/icon"
        android:layout_width="wrap_content"
        android:layout_height="fill_parent"
        android:layout_alignParentBottom="true"
        android:layout_alignParentTop="true"
        android:layout_marginRight="6dip"
        android:contentDescription="TODO"
        android:src="@android:mipmap/sym_def_app_icon" />

    <TextView
        android:id="@+id/secondLine"
        android:layout_width="fill_parent"
        android:layout_height="26dip"
        android:layout_alignParentBottom="true"
        android:layout_alignParentRight="true"
        android:layout_toRightOf="@id/icon"
        android:ellipsize="marquee"
        android:singleLine="true"
        android:text="Description"
        android:textSize="12sp" />

    <TextView
        android:id="@+id/firstLine"
        android:layout_width="fill_parent"
        android:layout_height="wrap_content"
        android:layout_above="@id/secondLine"
        android:layout_alignParentRight="true"
        android:layout_alignParentTop="true"
        android:layout_alignWithParentIfMissing="true"
        android:layout_toRightOf="@id/icon"
        android:gravity="center_vertical"
        android:text="Example application"
        android:textSize="16sp" />

</RelativeLayout>

layout baris yang kedua:
rowlayoutright.xml:

<RelativeLayout xmlns:android="http://schemas.android.com/apk/res/android"
    android:layout_width="fill_parent"
    android:layout_height="?android:attr/listPreferredItemHeight"
    android:padding="6dip" >

    <ImageView
        android:id="@+id/icon"
        android:layout_width="wrap_content"
        android:layout_height="fill_parent"
        android:layout_alignParentBottom="true"
        android:layout_alignParentTop="true"
        android:layout_alignParentRight="true"
        android:layout_marginLeft="6dip"
        android:contentDescription="TODO"
        android:src="@android:mipmap/sym_def_app_icon" />

    <TextView
        android:id="@+id/secondLine"
        android:layout_width="fill_parent"
        android:layout_height="26dip"
        android:layout_alignParentBottom="true"
android:gravity="right"
        android:ellipsize="marquee"
        android:singleLine="true"
        android:text="Description"
        android:textSize="12sp"
        android:layout_toLeftOf="@+id/icon"
        android:layout_toStartOf="@+id/icon" />

    <TextView

        android:id="@+id/firstLine"

        android:layout_width="fill_parent"
        android:layout_height="wrap_content"
        android:layout_above="@id/secondLine"
        android:layout_alignParentTop="true"
        android:layout_alignWithParentIfMissing="true"
        android:gravity="right"
        android:text="Example application"
        android:textSize="16sp"
        android:layout_toLeftOf="@+id/icon"
        android:layout_toStartOf="@+id/icon" />

</RelativeLayout>


activity_main.xml:
<RelativeLayout xmlns:android="http://schemas.android.com/apk/res/android"
    xmlns:tools="http://schemas.android.com/tools"
    android:layout_width="match_parent"
    android:layout_height="match_parent"
    >

    <!-- A RecyclerView with some commonly used attributes -->

    <android.support.v7.widget.RecyclerView
        android:id="@+id/my_recycler_view"
        android:layout_width="match_parent"
        android:layout_height="match_parent"
        android:scrollbars="vertical" />


</RelativeLayout>

MainActivity.java:


package oddsaydev.recyclerviewcoba;
import android.os.Bundle;
import android.support.v7.app.AppCompatActivity;
import android.support.v7.widget.LinearLayoutManager;
import android.support.v7.widget.RecyclerView;


import java.util.ArrayList;

public class MainActivity extends AppCompatActivity {
    private RecyclerView mRecyclerView;
    private RecyclerView.Adapter mAdapter;
    private RecyclerView.LayoutManager mLayoutManager;

    @Override
    protected void onCreate(Bundle savedInstanceState) {
        super.onCreate(savedInstanceState);
        setContentView(R.layout.activity_main);
        mRecyclerView = (RecyclerView) findViewById(R.id.my_recycler_view);

        // use this setting to improve performance if you know that changes
        // in content do not change the layout size of the RecyclerView
        mRecyclerView.setHasFixedSize(true);

        // use a linear layout manager
        mLayoutManager = new LinearLayoutManager(this);
        mRecyclerView.setLayoutManager(mLayoutManager);

        // specify an adapter (see also next example)
        ArrayList<String> mDataset=new ArrayList<>();
        for(int i=0;i<10;i++){
        String a="test "+i;
        mDataset.add(a);}
        mAdapter = new MyAdapter(mDataset);

        mRecyclerView.setAdapter(mAdapter);
    }

}

MyAdapter.java:

package oddsaydev.recyclerviewcoba;

/**
 * Created by Windows on 13/02/2017.
 */
import java.util.ArrayList;

import android.content.Context;
import android.support.v7.widget.RecyclerView;
import android.view.Gravity;
import android.view.LayoutInflater;
import android.view.View;
import android.view.View.OnClickListener;
import android.view.ViewGroup;
import android.widget.TextView;
import android.widget.Toast;

public class MyAdapter extends RecyclerView.Adapter<MyAdapter.ViewHolder> {
    private ArrayList<String> mDataset;

    // Provide a reference to the views for each data item
    // Complex data items may need more than one view per item, and
    // you provide access to all the views for a data item in a view holder
    public class ViewHolder extends RecyclerView.ViewHolder {
        // each data item is just a string in this case
        public TextView txtHeader;
        public TextView txtFooter;

        public ViewHolder(View v) {
            super(v);
            txtHeader = (TextView) v.findViewById(R.id.firstLine);
            txtFooter = (TextView) v.findViewById(R.id.secondLine);

        }
    }

    public void add(int position, String item) {
        mDataset.add(position, item);
        notifyItemInserted(position);
    }

    public void remove(String item) {
        int position = mDataset.indexOf(item);
        mDataset.remove(position);
        notifyItemRemoved(position);
    }

    // Provide a suitable constructor (depends on the kind of dataset)
    public MyAdapter(ArrayList<String> myDataset) {
        mDataset = myDataset;
    }

    // Create new views (invoked by the layout manager)
    Context context;
    @Override
    public MyAdapter.ViewHolder onCreateViewHolder(ViewGroup parent,
                                                   int viewType) {
        // create a new vie
        View v;
        ViewHolder vh;
        switch (viewType) {
            case TYPE_HEADER:
                 v = LayoutInflater.from(parent.getContext()).inflate(R.layout.rowlayoutright, parent, false);
                 vh = new ViewHolder(v);
                return vh;
            case TYPE_CELL:
               v = LayoutInflater.from(parent.getContext()).inflate(R.layout.rowlayoutleft, parent, false);
                 vh = new ViewHolder(v);
                return vh;        }


        return null;
    }
    private static final int TYPE_HEADER = 0;
    private static final int TYPE_CELL = 1;


    @Override
    public int getItemViewType(int position) {
        if (position%2 == 0)
            return TYPE_HEADER;
        else
            return TYPE_CELL;
    }
    // Replace the contents of a view (invoked by the layout manager)
    @Override
    public void onBindViewHolder(final ViewHolder holder, final int position) {
        // - get element from your dataset at this position
        // - replace the contents of the view with that element
        final String name = mDataset.get(position);

        switch (getItemViewType(position)) {
            case TYPE_HEADER:
                holder.txtHeader.setText(mDataset.get(position));
                holder.txtHeader.setOnClickListener(new OnClickListener() {
                    @Override
                    public void onClick(View v) {
                        //  remove(name);
                        Toast toast= Toast.makeText(v.getContext(),
                                "Gambar Kanan "+position, Toast.LENGTH_SHORT);
                        toast.show();            }
                });

                holder.txtFooter.setText("Footer: " + mDataset.get(position));
                break;
            case TYPE_CELL:
                holder.txtHeader.setText(mDataset.get(position));
                holder.txtHeader.setOnClickListener(new OnClickListener() {
                    @Override
                    public void onClick(View v) {
                        //  remove(name);
                        Toast toast= Toast.makeText(v.getContext(),
                                "Gambar Kiri "+position, Toast.LENGTH_SHORT);
                        toast.show();            }
                });

                holder.txtFooter.setText("Footer: " + mDataset.get(position));                break;
        }


    }

    // Return the size of your dataset (invoked by the layout manager)
    @Override
    public int getItemCount() {
        return mDataset.size();
    }

}


-)Potongan kode dibawah pada MyAdapter.java menentukan kapan  layout baris pertama dan kedua digunakan


    @Override
    public MyAdapter.ViewHolder onCreateViewHolder(ViewGroup parent,
                                                   int viewType) {
        // create a new vie
        View v;
        ViewHolder vh;
        switch (viewType) {
            case TYPE_HEADER:
                 v = LayoutInflater.from(parent.getContext()).inflate(R.layout.rowlayoutright, parent, false);
                 vh = new ViewHolder(v);
                return vh;
            case TYPE_CELL:
               v = LayoutInflater.from(parent.getContext()).inflate(R.layout.rowlayoutleft, parent, false);
                 vh = new ViewHolder(v);
                return vh;        }


        return null;
    }
    private static final int TYPE_HEADER = 0;
    private static final int TYPE_CELL = 1;


    @Override
    public int getItemViewType(int position) {
        if (position%2 == 0)
            return TYPE_HEADER;
        else
            return TYPE_CELL;
    }


Hasil dari running kode2 diatas
Gambar 2. Hasil akhir


Selamat bereksperimen sekian dan terimakasih